Powerwall+ / Tesla Solar Inverter is Under Producing
Symptoms
On the landing page, solar production is lower than expected. On the Powerwall+ / Tesla Solar Inverter Device page, the correct number of strings is displayed (the connected strings appear as green), but the solar production value for one or more strings is lower than expected.
Steps to Troubleshoot
- If Powerwall+ / Tesla Solar Inverter
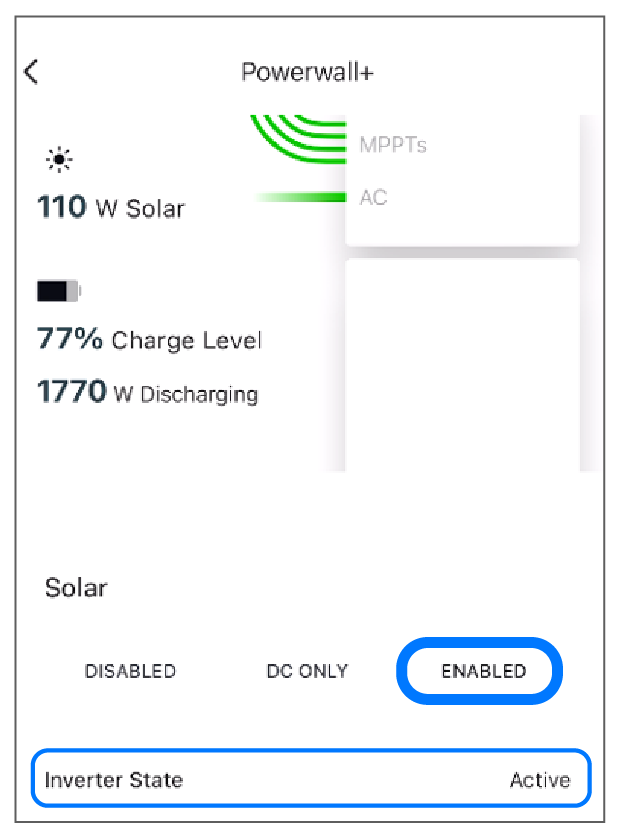
solar has been Enabled, wait up to 30 minutes for the inverter to start
production. It may take time for production to start, particularly if it is a
cloudy day; this is likely the issue if voltage is as expected (per the planset)
but amperage is low.

- If the voltage displayed
in Tesla One is lower than expected:
- Confirm the system is not curtailing solar due to being in a non-export mode (see Set Import & Export Limits).
- On the Powerwall+ / Tesla Solar Inverter Device page, set the Solar state to DC Only mode.
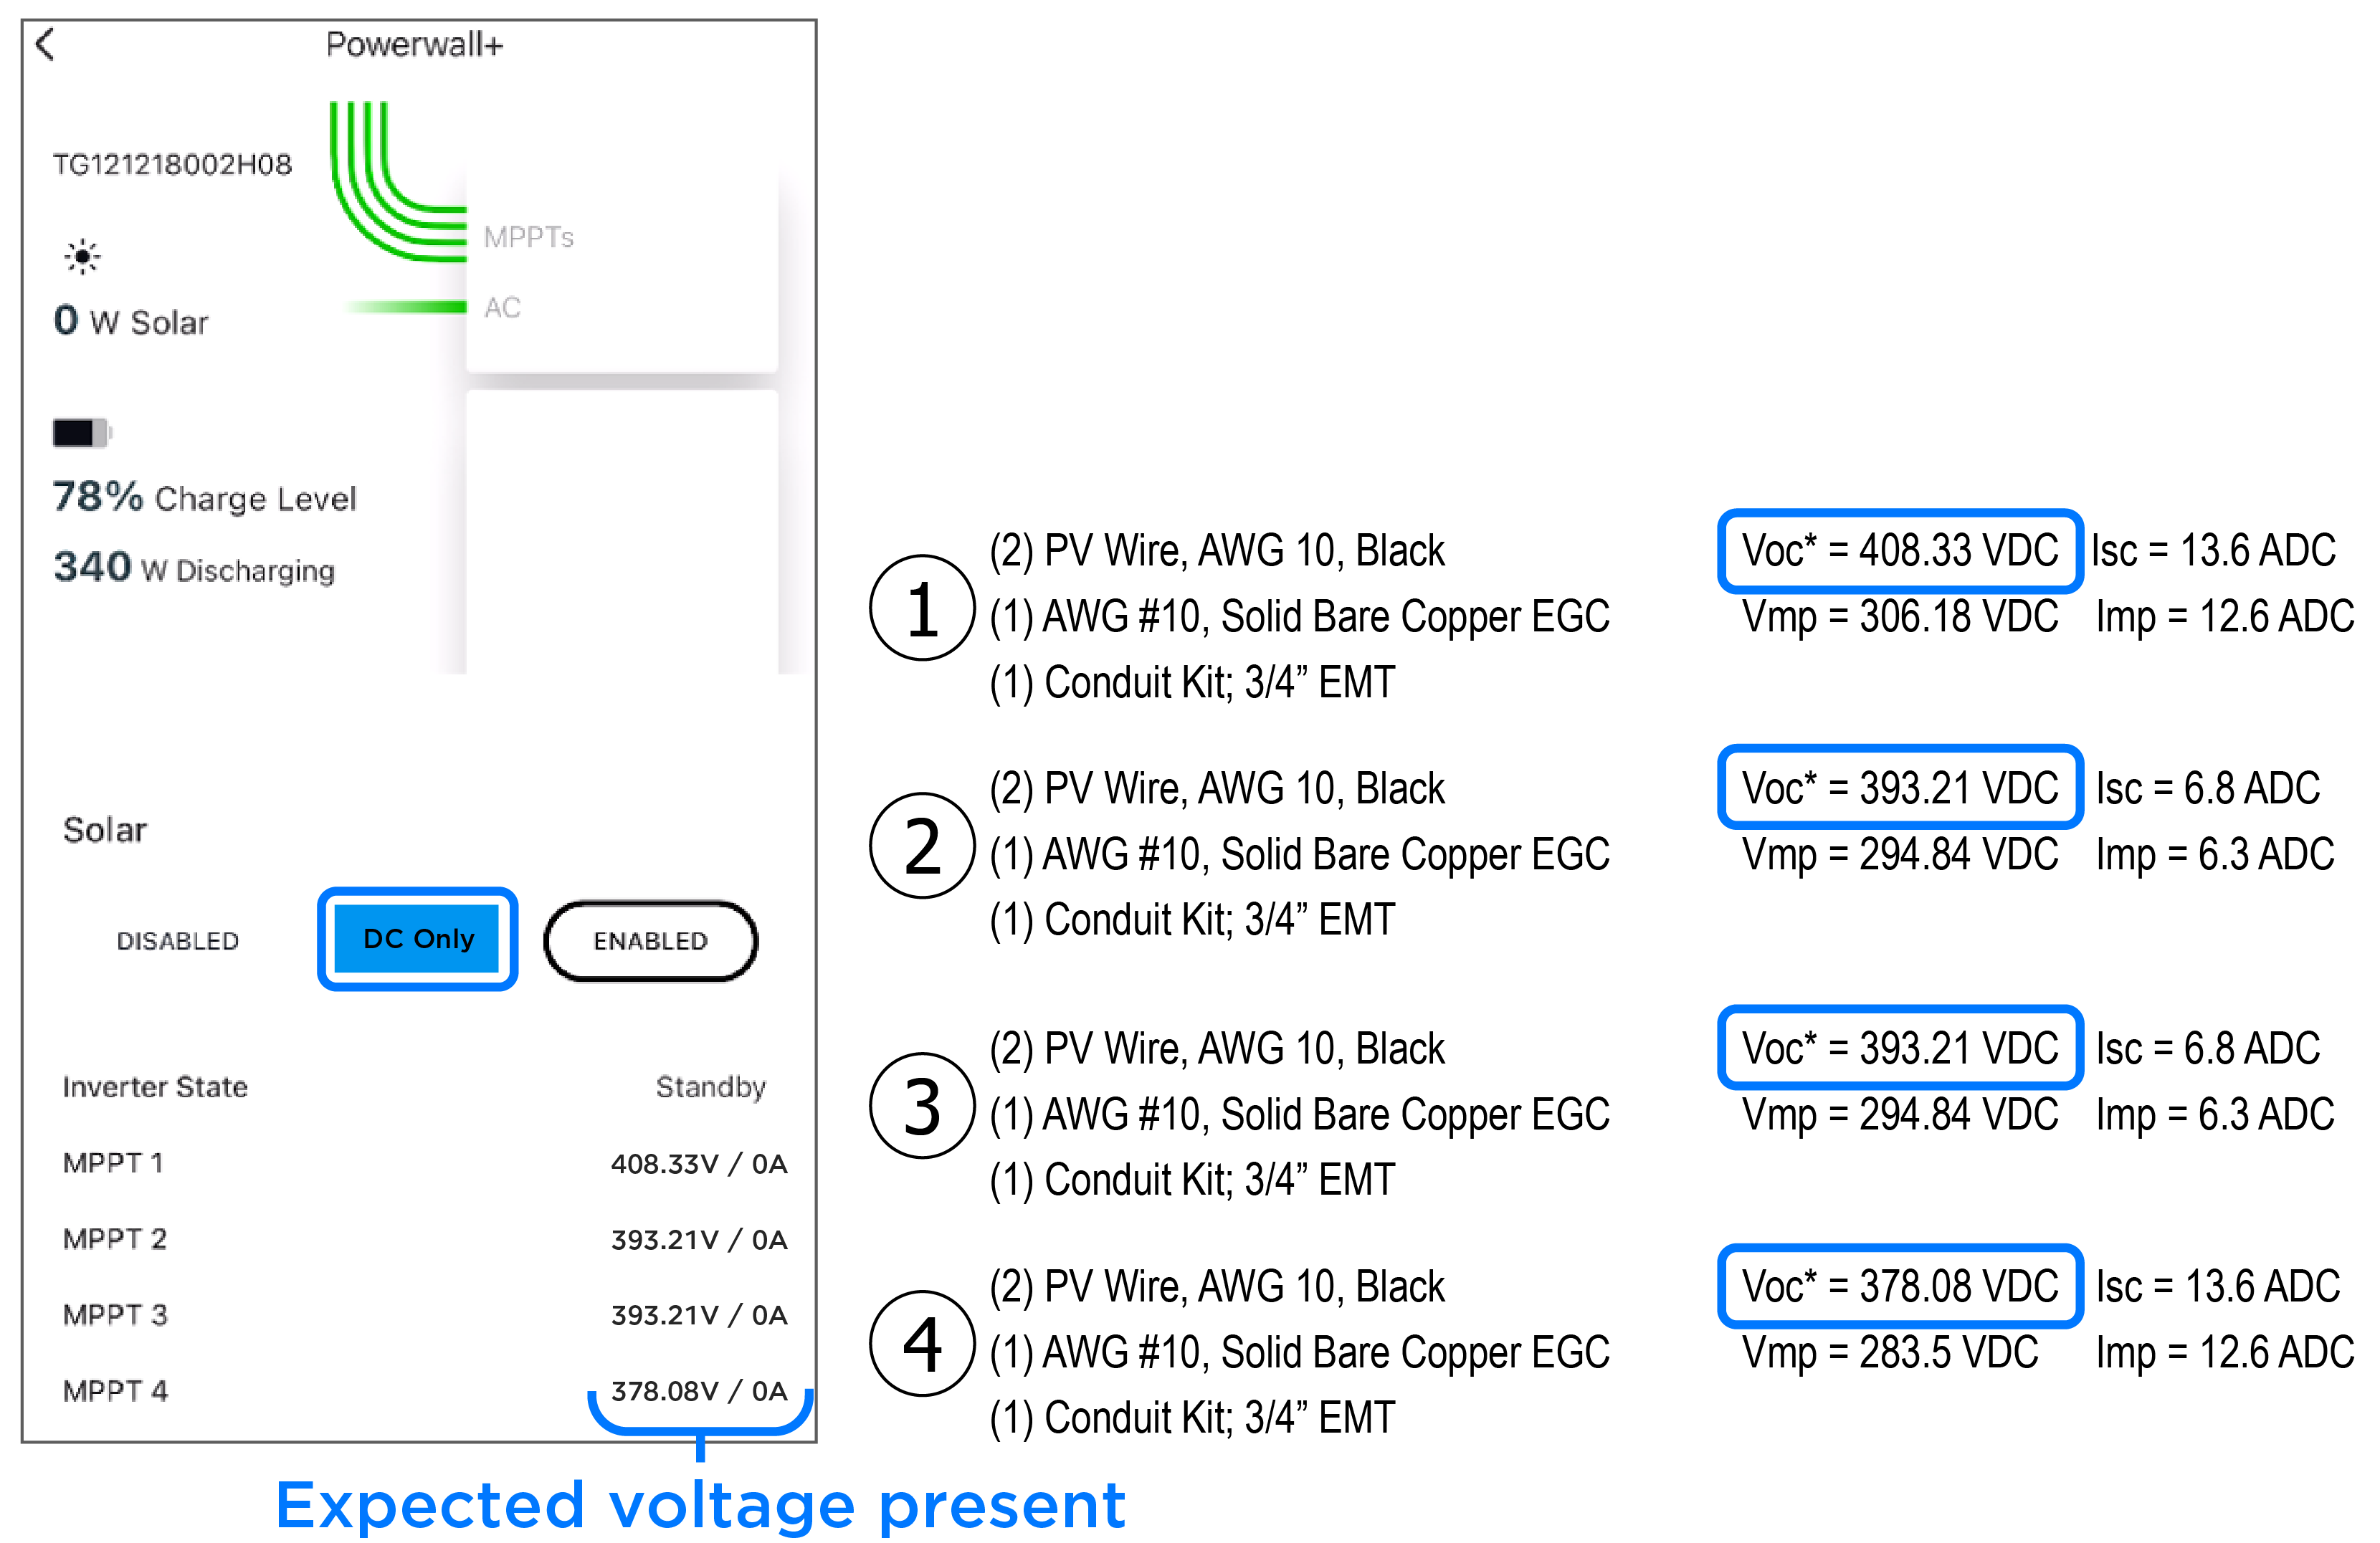
- Confirm each string
displays the expected voltage (VOC) as displayed on the planset.
Figure 1. Comparing Powerwall+ String Voltage with Expected Voltage on Planset  NoteIf strings do NOT display the expected voltage, review the VOC of all strings before proceeding. Consider the following scenario:
- String A has an expected voltage of 350 VDC but displays a VOC of 410 VDC
- String B has an expected voltage of 410 VDC but displays a VOC of 350 VDC
NoteIf a planset with expected VOCs is not available, each string's expected VOC can be calculated by multiplying the panel VOC (found on the panel datasheet) by the number of modules in the string. For instance, a string of 5 modules that have a module VOC of 45.27 would have an expected string VOC of 226.35 V
- If the VOC is significantly lower
than the expected VOC on the planset, confirm the system stringing is correct
according to the planset:
- Confirm all panels in the string are connected. Missing panels would result in a lower VOC than expected.
- Confirm all modules have been connected properly (positive to negative). Any module with reverse polarity (positive connected to positive and negative connected to negative) subtracts from the positive voltage of the string. For instance, if there are 5 modules connected with correct polarity, and 2 modules connected with reverse polarity, the string VOC will reflect only 3 modules.
- Confirm that any combined (paralleled) strings have been wired according to the planset, and that they have been combined correctly (both positives combined and both negatives combined, no positive combined with negative). Not paralleling strings as outlined will result in the system under-producing. See the Tesla Solar Inverter DC Wiring Cheat Sheet or the Powerwall+ DC Wiring Cheat Sheet for common stringing configurations.
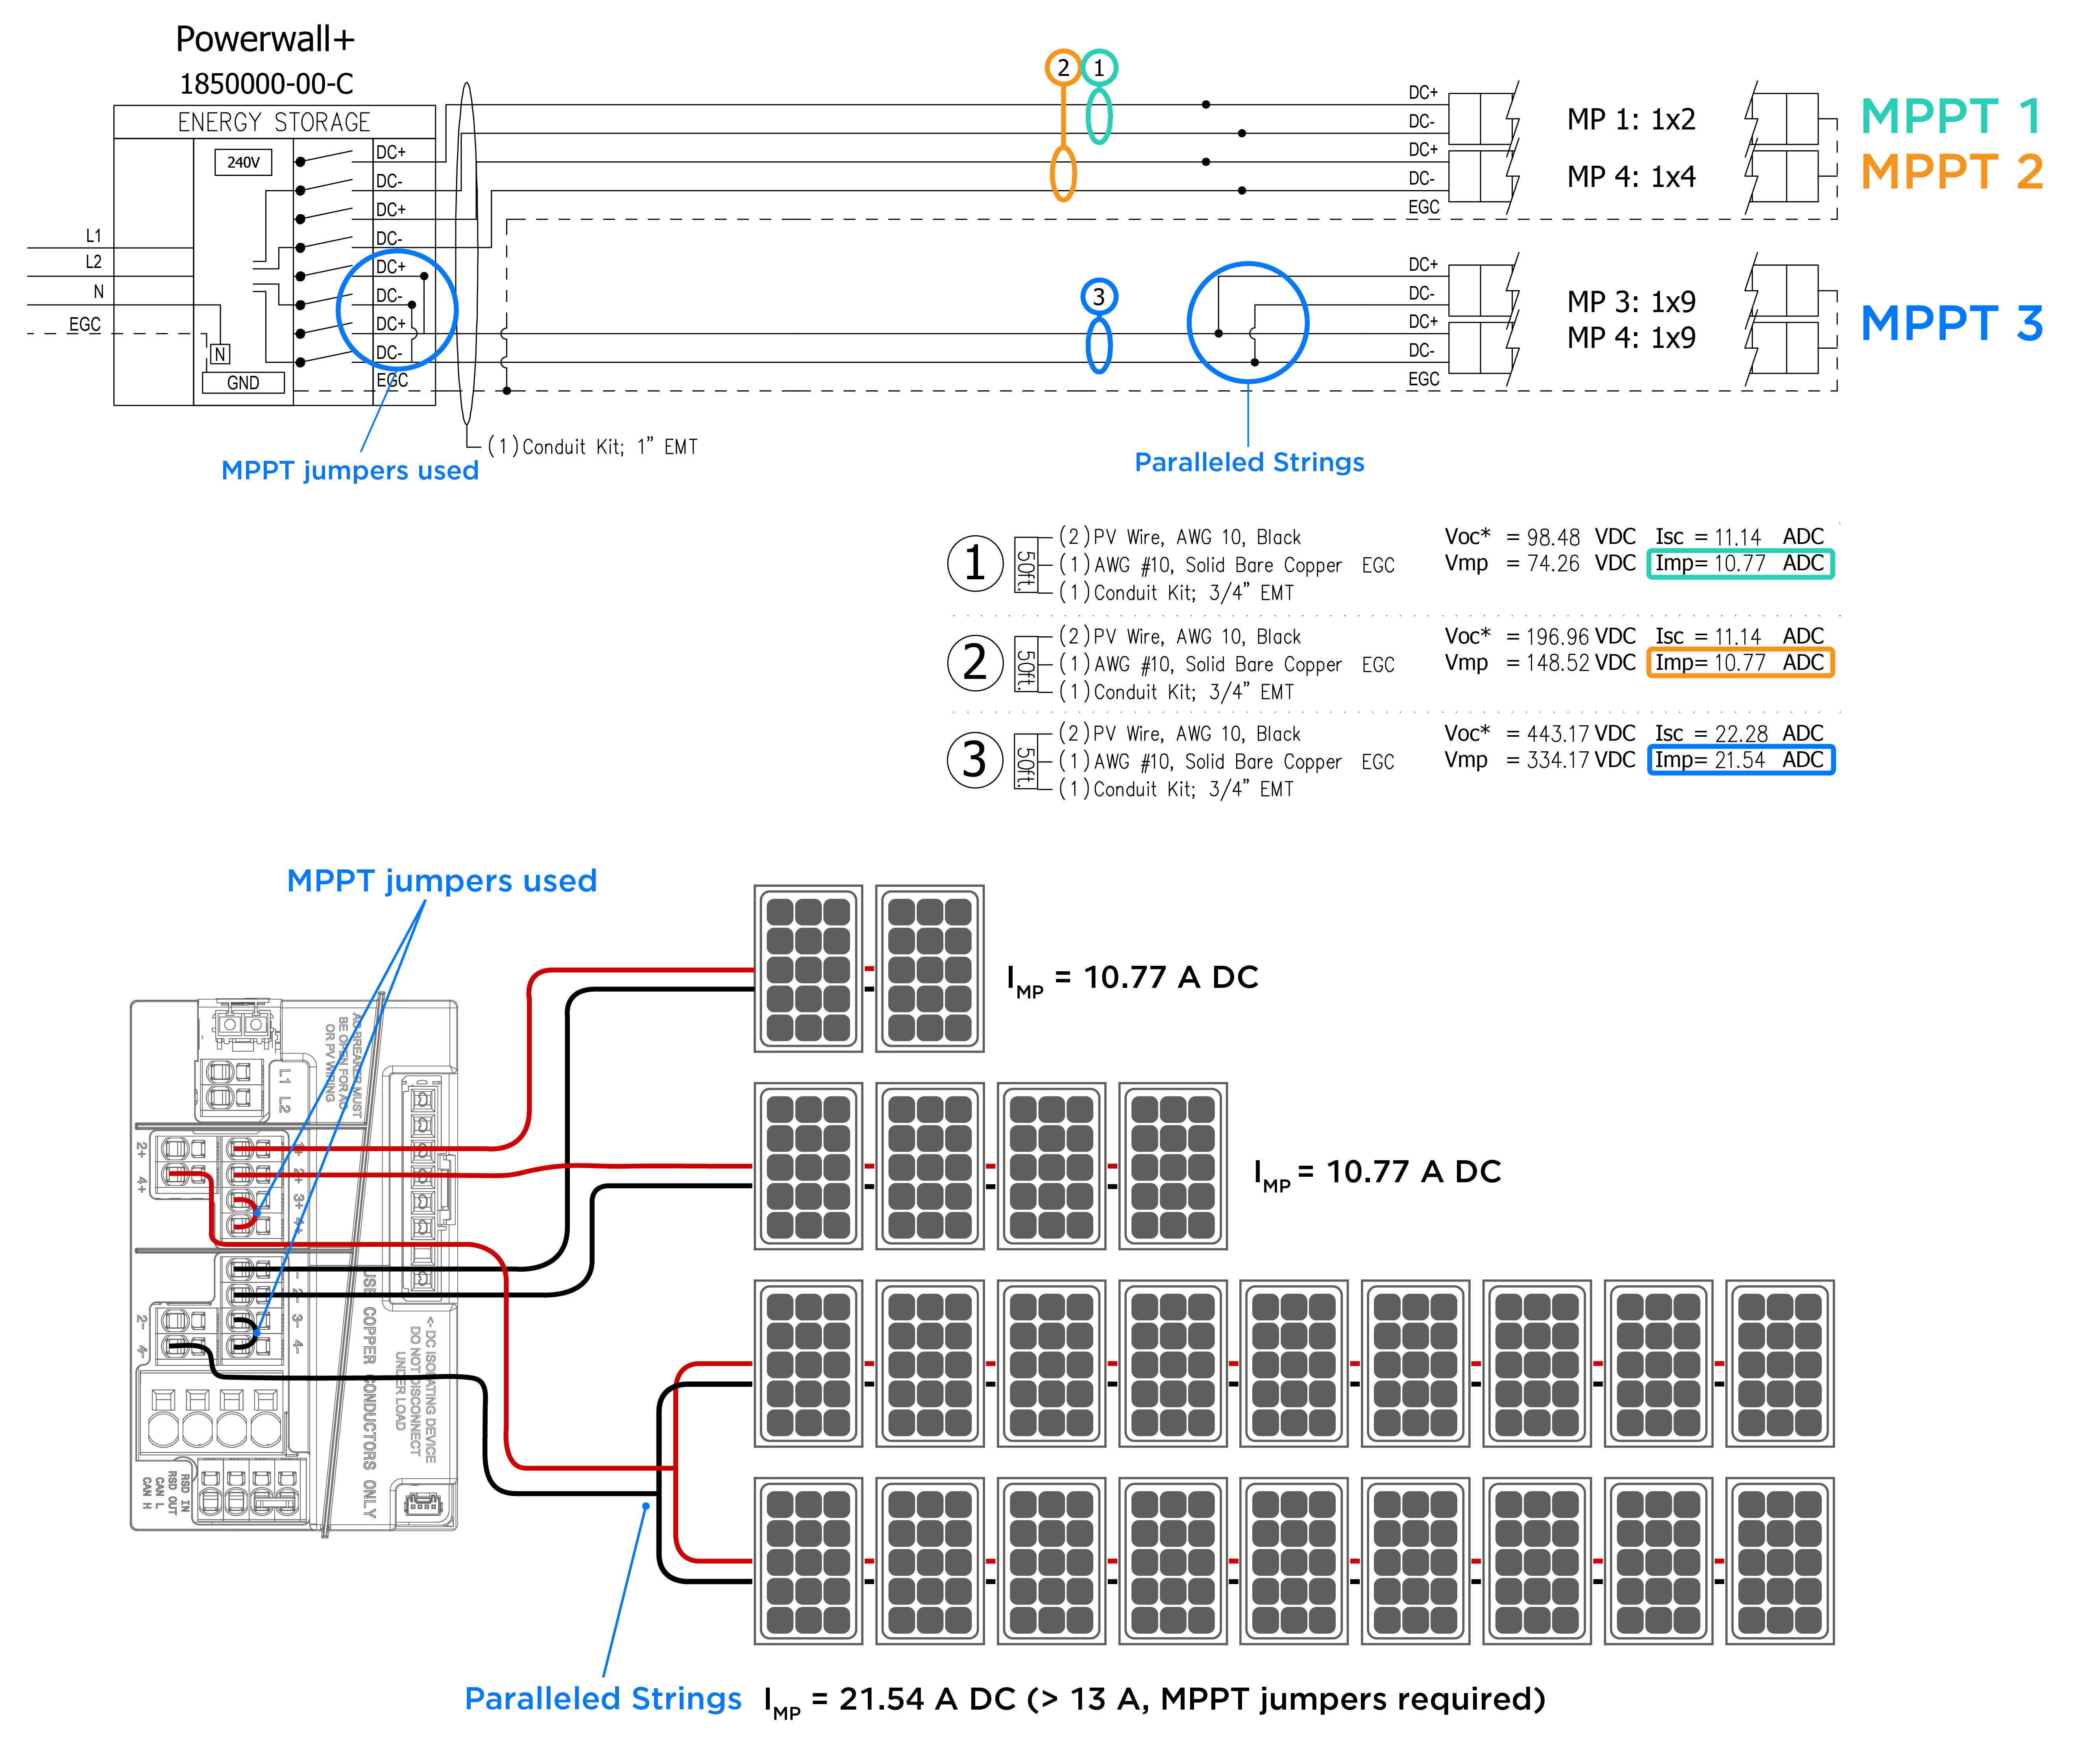
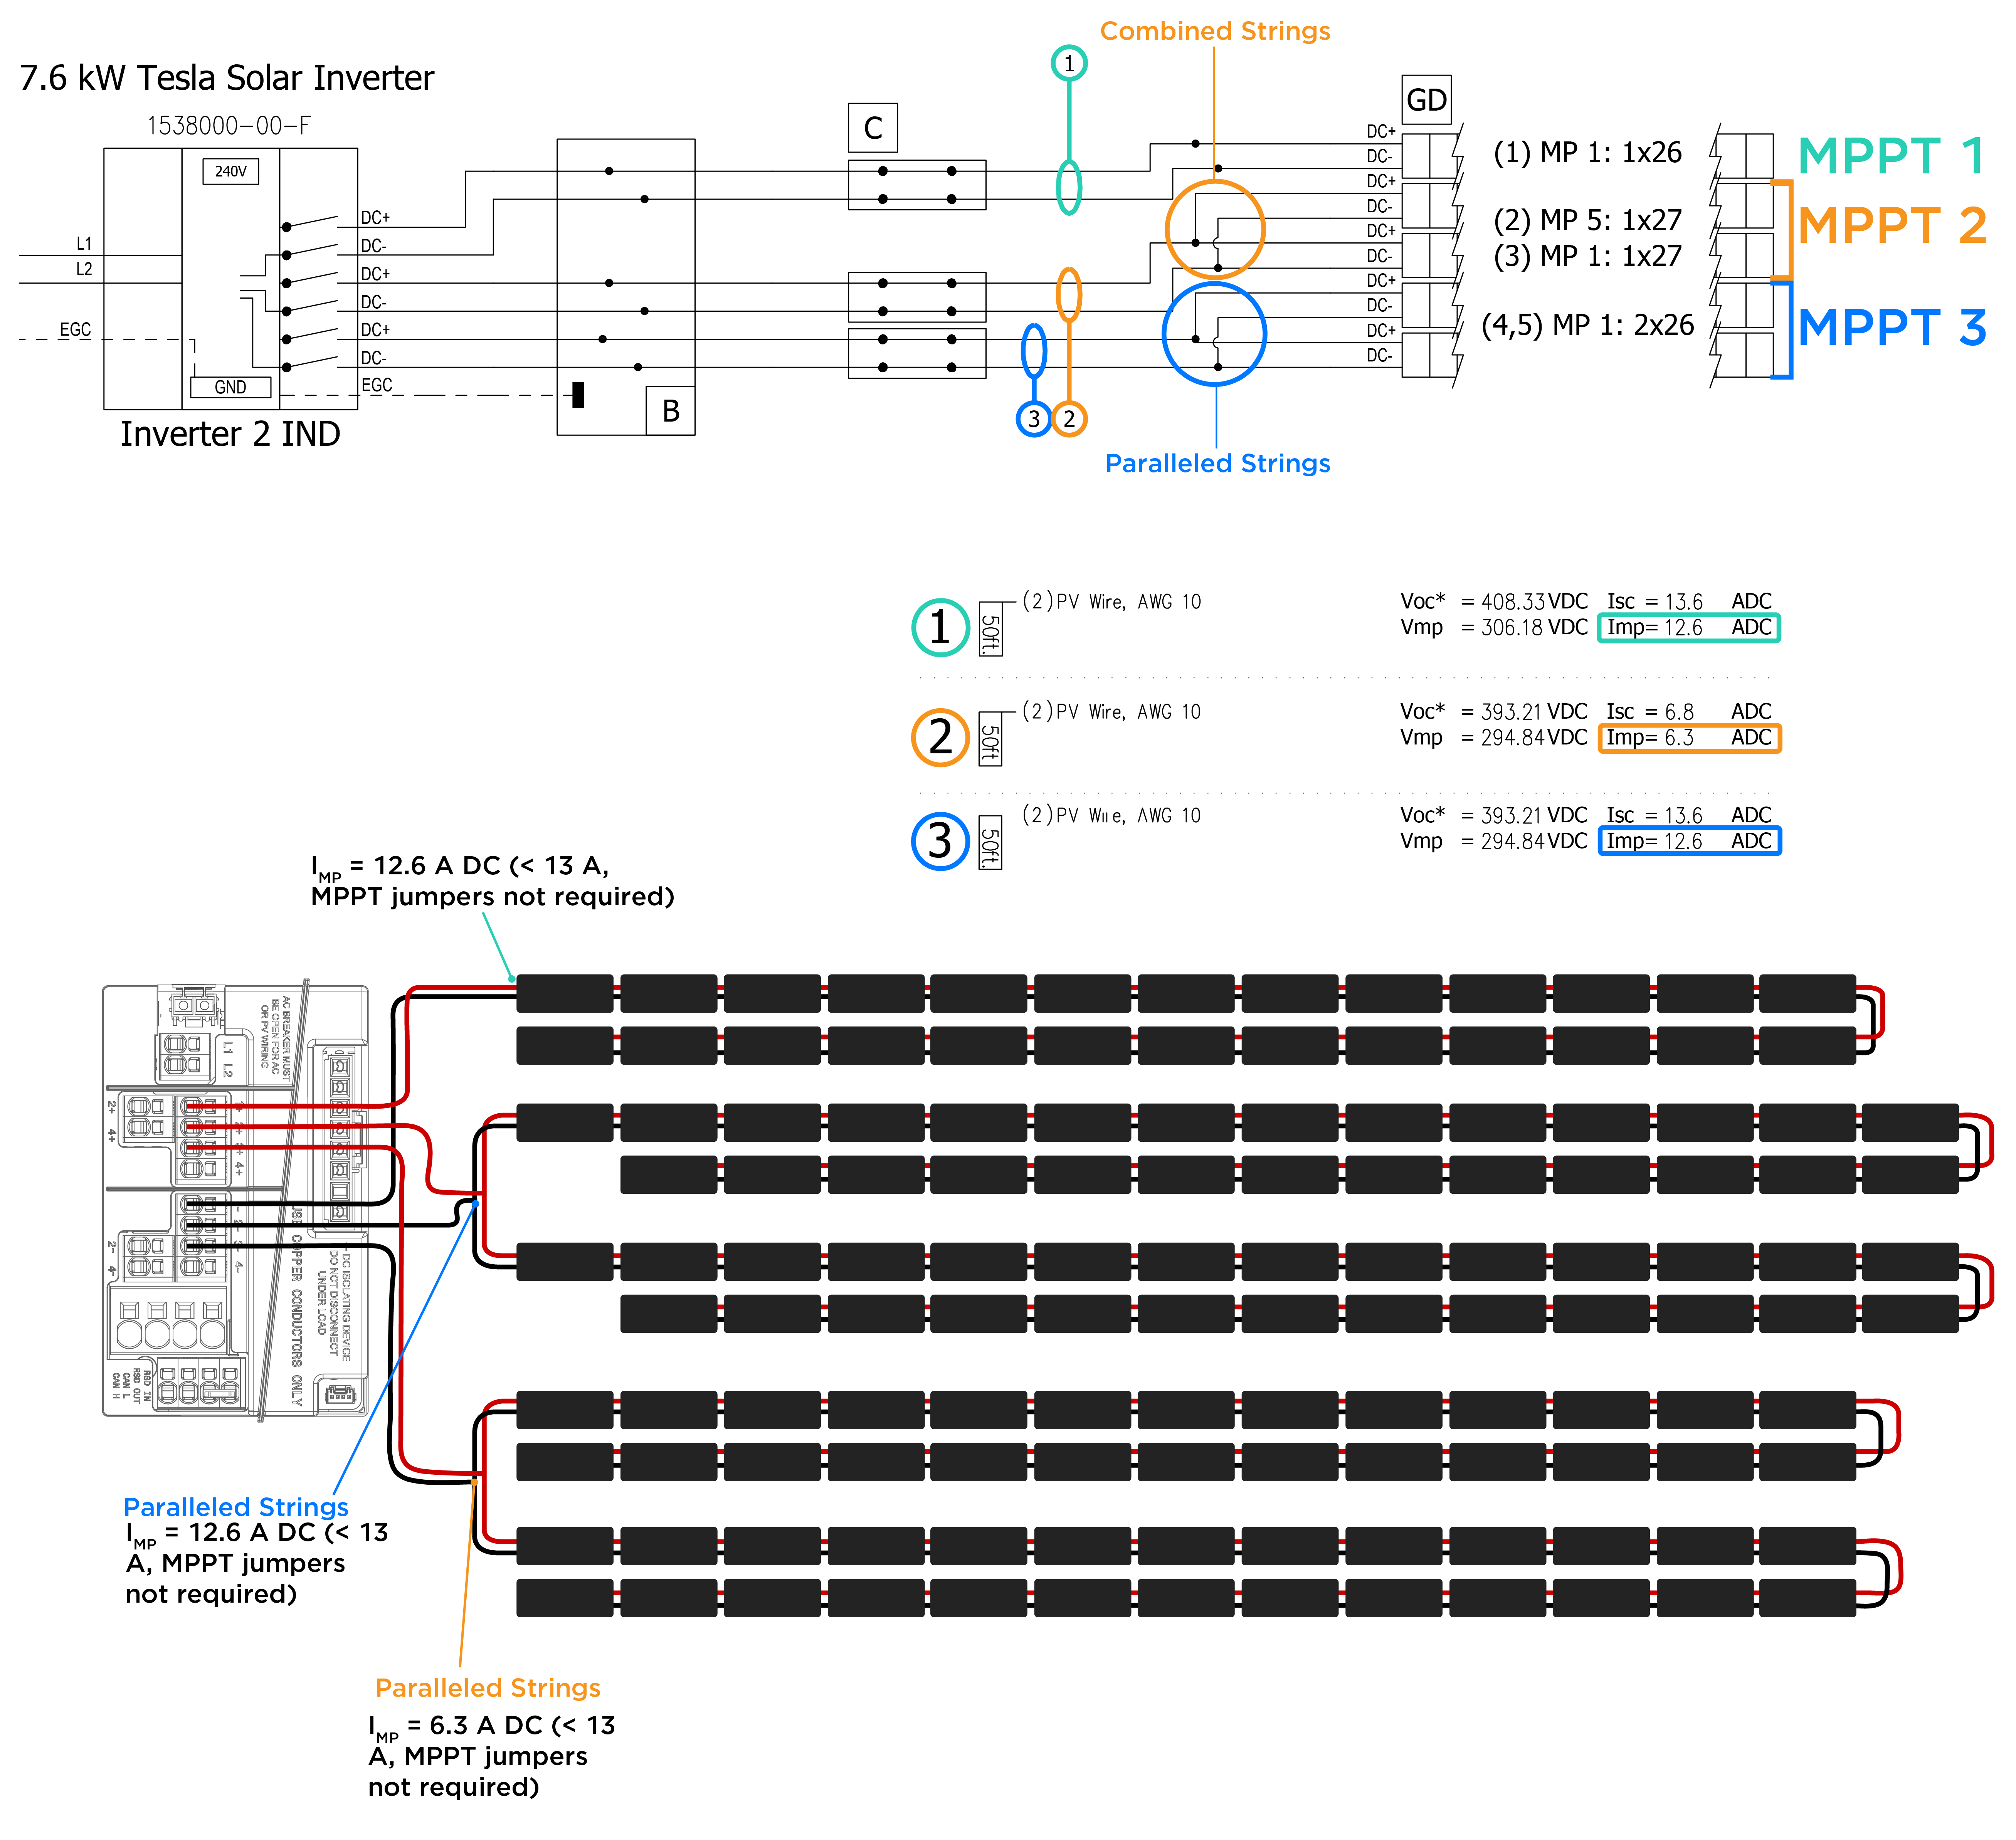
- Confirm that MPPT jumpers
have been installed according to the planset.NoteJumpers are required when Imp > 13A. As displayed in the examples below, paralleled strings with a combined Imp < 13 A do not require an MPPT jumper.
Figure 2. Example 1: Powerwall+ with Solar Panels 
Figure 3. Example 2: Tesla Solar Inverter with Solar Roof 
- If all wiring has been
performed correctly, look for evidence of damage that may be causing the
string to under perform:
- Inspect where the wires exit conduit, as nicked wires may occur here
- Check for wires pinched by mounting hardware
- If the VOC is correct (matches
the expected VOC on the planset), confirm Powerwall+ / Tesla
Solar Inverter is not the issue by testing
the string in another MPPT:
- Select Stop System on the landing page in Tesla One, then turn Powerwall+ / Tesla Solar Inverter OFF.
- Disconnect a functional string (displays the correct voltage and amperage when the system is running) from its MPPT (consider this a functional MPPT).
- Disconnect the problematic string from its MPPT, then connect the problematic string to the functional MPPT.
- Turn the system back ON and Start System.
- If the problematic string
now displays the correct voltage and amperage (while plugged in to the
functional MPPT), contact Tesla Support for additional troubleshooting
support.NoteTurn Powerwall+ / Tesla Solar Inverter OFF again and move the string back to its original (presumed faulty) MPPT to confirm that MPPT still does not function. If, upon moving back to the original MPPT, the string displays the correct voltage, the issue is resolved. No additional action is required.
- If the string is still displaying low voltage while plugged in to the functional MPPT, the issue is not Powerwall+ / Tesla Solar Inverter. The system may have a faulty MCI; perform the troubleshooting steps in MCI Diode Test and Resistance Test (MCI Health Tests) to identify the faulty MCI(s).
- If the amperage displayed
in Tesla One is lower than expected and
none of the previous troubleshooting steps have resolved the issue:
- Look for greater shade than anticipated (may be caused by snow or leaves). Heavy shade would result in a lower current than expected.
- Perform an irradiance
test for each string on the roof:
- Place an irradiance meter on the roof, facing the same direction as the modules in the string.
- Calculate the expected amperage for the string by multiplying
the irradiance value by the IMP of the PV module,
then dividing that value by 1000; for instance:
- Irradiance reading = 363 W/m2
- PV module IMP = 9.12 A (found on module datasheet)
- Expected amperage = (363 W/m2 * 9.12) / 1000 = 3.31 A
- If the irradiance values are lower than 100 W/m2, light levels are likely too low for accurate testing (meaning low amperage would be expected in the Tesla One interface).
- If the amperage displayed in Tesla One is significantly lower than the calculated expected amperage, measure each string's amperage individually. Confirm each string is producing an amperage value; if one is not, perform the troubleshooting steps in MCI Diode Test and Resistance Test (MCI Health Tests) to inspect the MCIs in that string.
- If a string is producing unexpectedly low amperage, inspect that string for wiring errors. For combined (paralleled) strings, confirm each individual string is producing amperage, and confirm they have been combined correctly and are connected properly.
- If the issue persists, contact Tesla Support.